
SpringBoot高频面试题
Springboot的优点
- 内置servlet容器,不需要在服务器部署 tomcat。只需要将项目打成 jar 包,使用 java -jar xxx.jar一键式启动项目
- SpringBoot提供了starter,把常用库聚合在一起,简化复杂的环境配置,快速搭建spring应用环境
- 可以快速创建独立运行的spring项目,集成主流框架
- 准生产环境的运行应用监控
SpringBoot 中的 starter 到底是什么 ?
starter提供了一个自动化配置类,一般命名为 XXXAutoConfiguration ,在这个配置类中通过条件注解来决定一个配置是否生效(条件注解就是 Spring 中原本就有的),然后它还会提供一系列的默认配置,也允许开发者根据实际情况自定义相关配置,然后通过类型安全的属性注入将这些配置属性注入进来,新注入的属性会代替掉默认属性。正因为如此,很多第三方框架,我们只需要引入依赖就可以直接使用了。
运行 SpringBoot 有哪几种方式?
- 打包用命令或者者放到容器中运行
- 用 Maven/Gradle 插件运行
- 直接执行 main 方法运行
SpringBoot 常用的 Starter 有哪些?
- spring-boot-starter-web :提供 Spring MVC + 内嵌的 Tomcat 。
- spring-boot-starter-data-jpa :提供 Spring JPA + Hibernate 。
- spring-boot-starter-data-Redis :提供 Redis 。
- mybatis-spring-boot-starter :提供 MyBatis 。
Spring Boot 的核心注解是哪个?
启动类上面的注解是@SpringBootApplication,它也是 Spring Boot 的核心注解,主要组合包含了以下 3 个注解:
- @SpringBootConfiguration:组合了 @Configuration 注解,实现配置文件的功能。
- @EnableAutoConfiguration:打开自动配置的功能,也可以关闭某个自动配置的选项,如关闭数据源自动配置功能: @SpringBootApplication(exclude = { DataSourceAutoConfiguration.class })。
- @ComponentScan:Spring组件扫描。
本文已经收录到Github仓库,该仓库包含计算机基础、Java基础、多线程、JVM、数据库、Redis、Spring、Mybatis、SpringMVC、SpringBoot、分布式、微服务、设计模式、架构、校招社招分享等核心知识点,欢迎star~
如果访问不了Github,可以访问*******。
自动配置原理
SpringBoot实现自动配置原理图解:
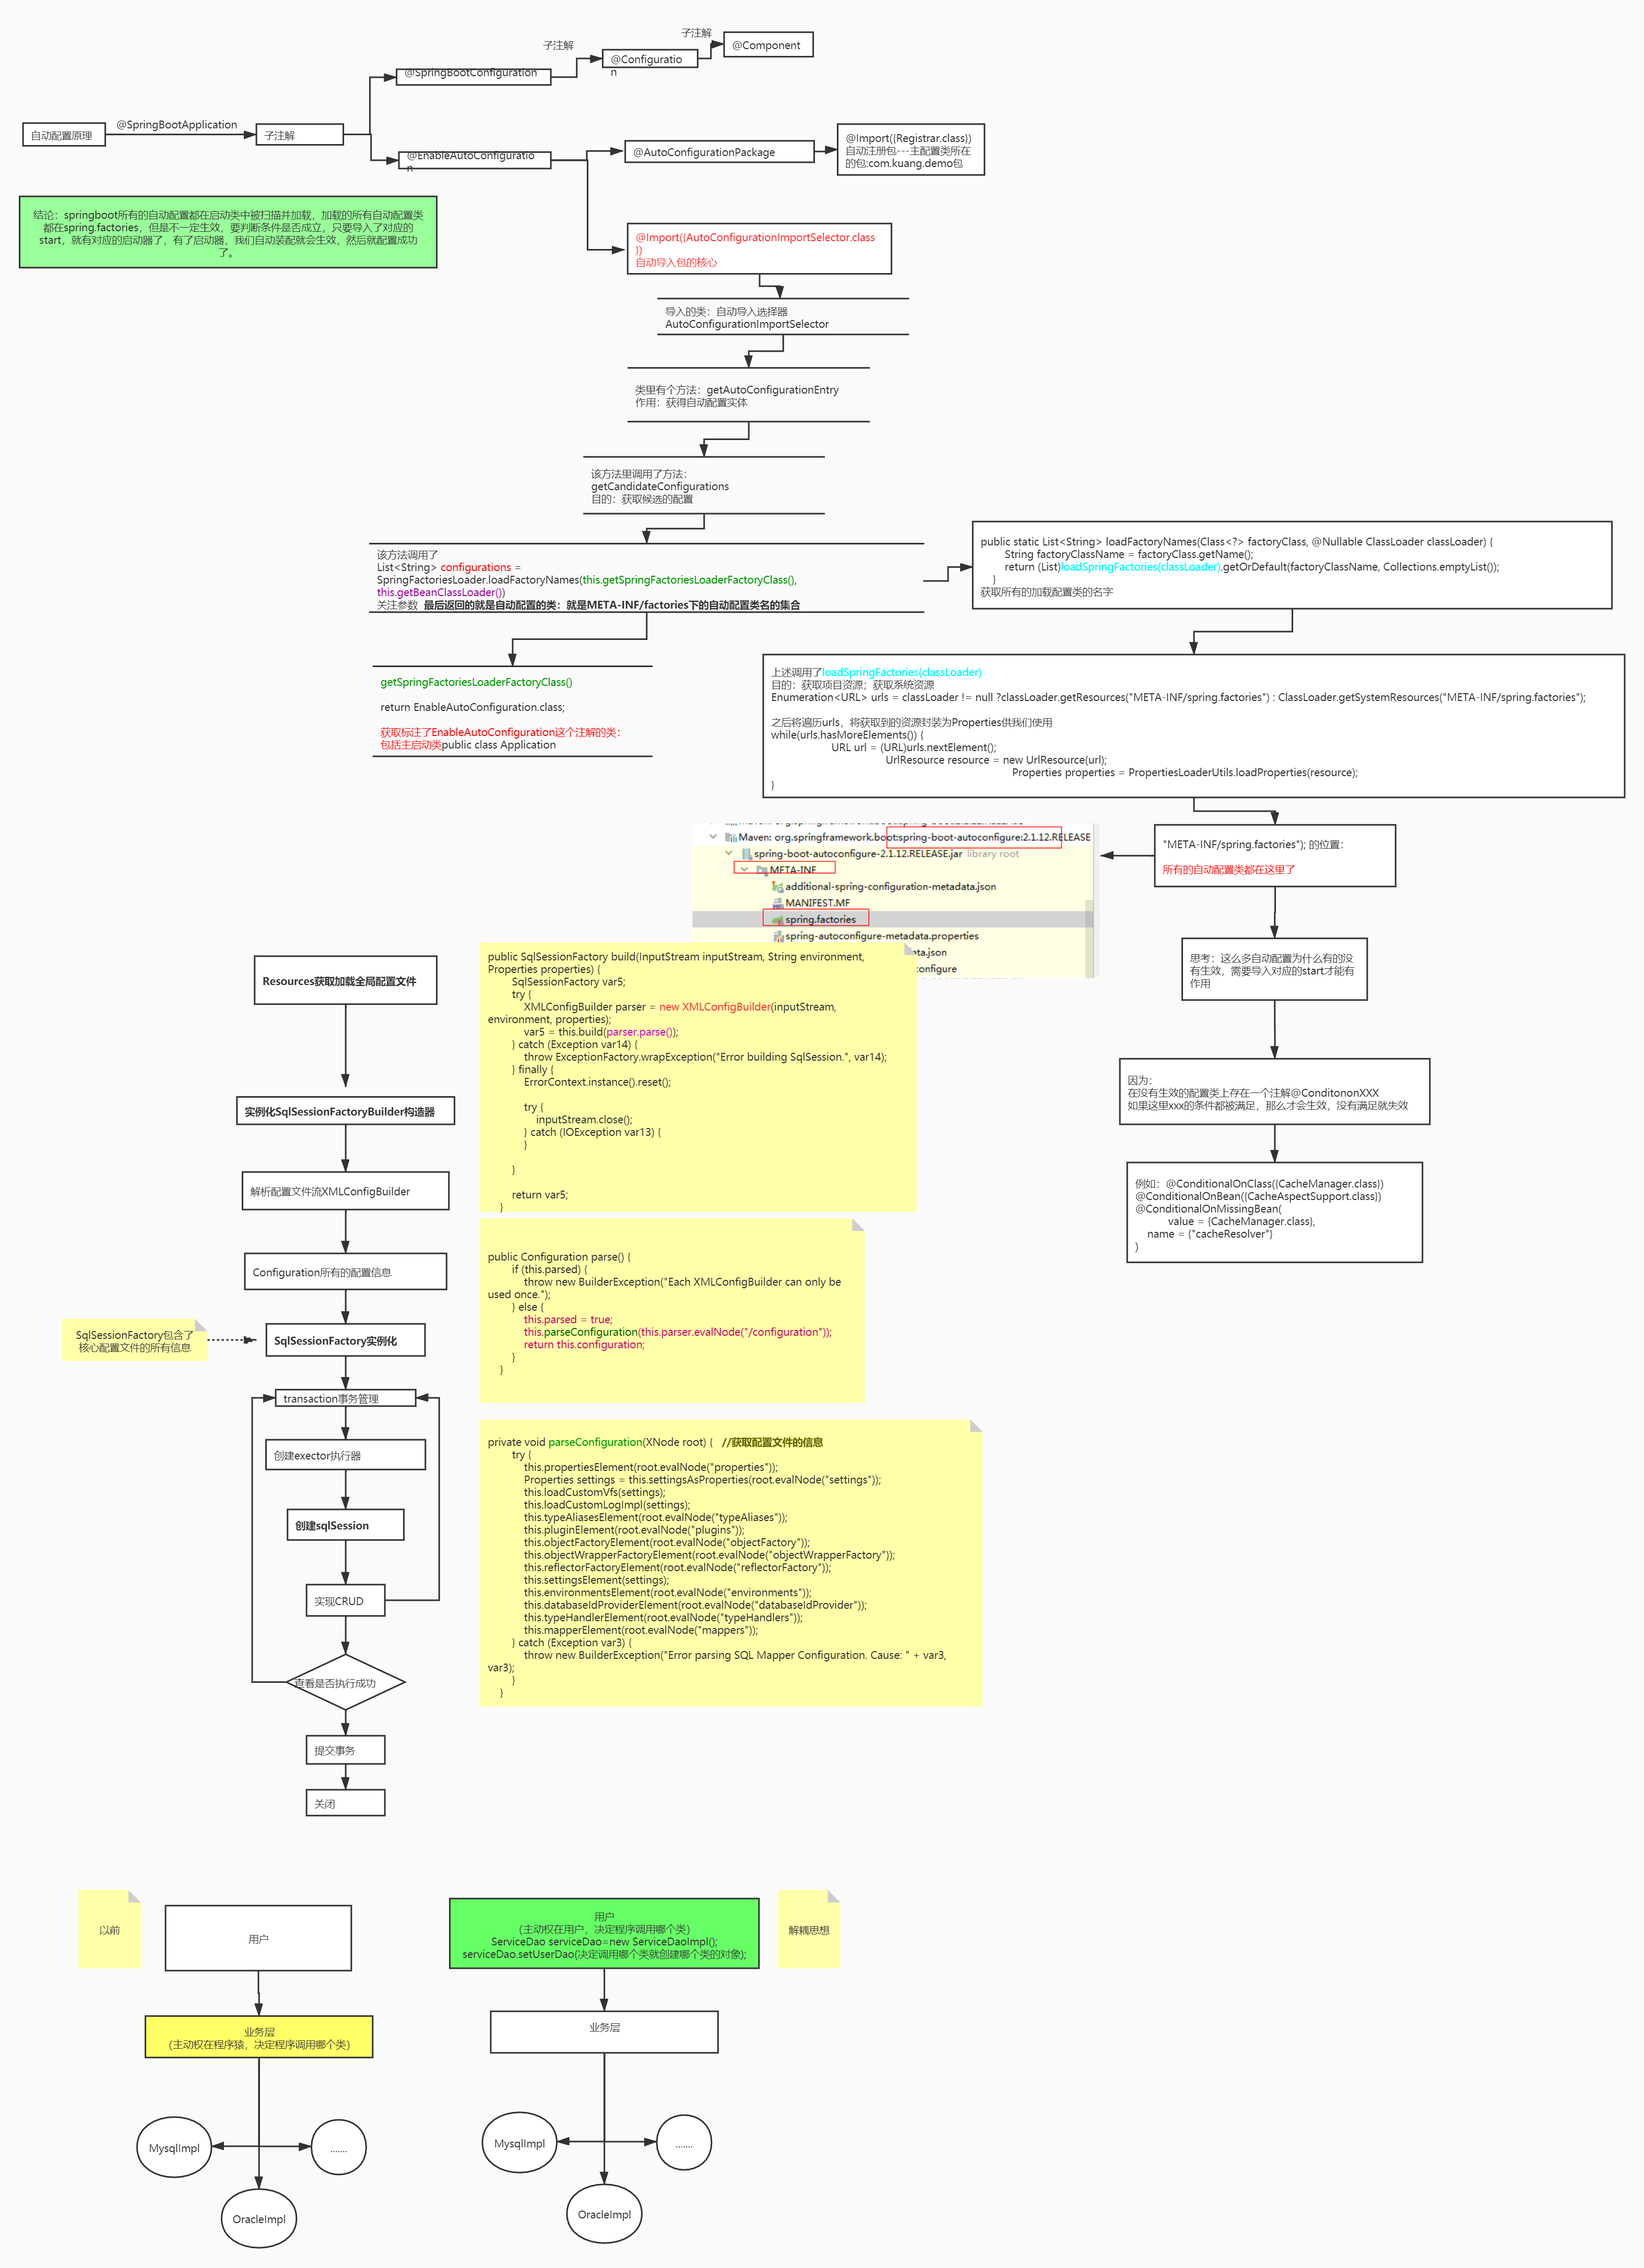
在 application.properties 中设置属性 debug=true,可以在控制台查看已启用和未启用的自动配置。
@SpringBootApplication是@Configuration、@EnableAutoConfiguration和@ComponentScan的组合。
@Configuration表示该类是Java配置类。
@ComponentScan开启自动扫描符合条件的bean(添加了@Controller、@Service等注解)。
@EnableAutoConfiguration会根据类路径中的jar依赖为项目进行自动配置,比如添加了spring-boot-starter-web依赖,会自动添加Tomcat和Spring MVC的依赖,然后Spring Boot会对Tomcat和Spring MVC进行自动配置(spring.factories EnableAutoConfiguration配置了WebMvcAutoConfiguration)。
@Target(ElementType.TYPE)
@Retention(RetentionPolicy.RUNTIME)
@Documented
@Inherited
@AutoConfigurationPackage
@Import(EnableAutoConfigurationImportSelector.class)
public @interface EnableAutoConfiguration {
}
EnableAutoConfiguration主要由 @AutoConfigurationPackage,@Import(EnableAutoConfigurationImportSelector.class)这两个注解组成的。
@AutoConfigurationPackage用于将启动类所在的包里面的所有组件注册到spring容器。
@Import 将EnableAutoConfigurationImportSelector注入到spring容器中,EnableAutoConfigurationImportSelector通过SpringFactoriesLoader从类路径下去读取META-INF/spring.factories文件信息,此文件中有一个key为org.springframework.boot.autoconfigure.EnableAutoConfiguration,定义了一组需要自动配置的bean。
# Auto Configure
org.springframework.boot.autoconfigure.EnableAutoConfiguration=\
org.springframework.boot.autoconfigure.admin.SpringApplicationAdminJmxAutoConfiguration,\
org.springframework.boot.autoconfigure.aop.AopAutoConfiguration,\
org.springframework.boot.autoconfigure.amqp.RabbitAutoConfiguration,\
org.springframework.boot.autoconfigure.batch.BatchAutoConfiguration,\
org.springframework.boot.autoconfigure.cache.CacheAutoConfiguration,\
这些配置类不是都会被加载,会根据xxxAutoConfiguration上的@ConditionalOnClass等条件判断是否加载,符合条件才会将相应的组件被加载到spring容器。(比如mybatis-spring-boot-starter,会自动配置sqlSessionFactory、sqlSessionTemplate、dataSource等mybatis所需的组件)
@Configuration
@ConditionalOnClass({ EnableAspectJAutoProxy.class, Aspect.class, Advice.class,
		AnnotatedElement.class }) //类路径存在EnableAspectJAutoProxy等类文件,才会加载此配置类
@ConditionalOnProperty(prefix = "spring.aop", name = "auto", havingValue = "true", matchIfMissing = true)
public class AopAutoConfiguration {

	@Configuration
	@EnableAspectJAutoProxy(proxyTargetClass = false)
	@ConditionalOnProperty(prefix = "spring.aop", name = "proxy-target-class", havingValue = "false", matchIfMissing = false)
	public static class JdkDynamicAutoProxyConfiguration {

	}

	@Configuration
	@EnableAspectJAutoProxy(proxyTargetClass = true)
	@ConditionalOnProperty(prefix = "spring.aop", name = "proxy-target-class", havingValue = "true", matchIfMissing = true)
	public static class CglibAutoProxyConfiguration {

	}

}
全局配置文件中的属性如何生效,比如:server.port=8081,是如何生效的?
@ConfigurationProperties的作用就是将配置文件的属性绑定到对应的bean上。全局配置的属性如:server.port等,通过@ConfigurationProperties注解,绑定到对应的XxxxProperties bean,通过这个 bean 获取相应的属性(serverProperties.getPort())。
//server.port = 8080
@ConfigurationProperties(prefix = "server", ignoreUnknownFields = true)
public class ServerProperties {
	private Integer port;
	private InetAddress address;

	@NestedConfigurationProperty
	private final ErrorProperties error = new ErrorProperties();
	private Boolean useForwardHeaders;
	private String serverHeader;
    //...
}
实现自动配置
实现当某个类存在时,自动配置这个类的bean,并且可以在application.properties中配置bean的属性。
(1)新建Maven项目spring-boot-starter-hello,修改pom.xml如下:
<?xml version="1.0" encoding="UTF-8"?>
<project xmlns="http://maven.apache.org/POM/4.0.0"
         xmlns:xsi="http://www.w3.org/2001/XMLSchema-instance"
         xsi:schemaLocation="http://maven.apache.org/POM/4.0.0 http://maven.apache.org/xsd/maven-4.0.0.xsd">
    <modelVersion>4.0.0</modelVersion>

    <groupId>com.tyson</groupId>
    <artifactId>spring-boot-starter-hello</artifactId>
    <version>1.0-SNAPSHOT</version>

    <dependencies>
        <dependency>
            <groupId>org.springframework.boot</groupId>
            <artifactId>spring-boot-autoconfigure</artifactId>
            <version>1.3.0.M1</version>
        </dependency>
        <dependency>
            <groupId>junit</groupId>
            <artifactId>junit</artifactId>
            <version>3.8.1</version>
        </dependency>
    </dependencies>

</project>
(2)属性配置
public class HelloService {
    private String msg;

    public String getMsg() {
        return msg;
    }

    public void setMsg(String msg) {
        this.msg = msg;
    }

    public String sayHello() {
        return "hello" + msg;

    }
}


import org.springframework.boot.context.properties.ConfigurationProperties;

@ConfigurationProperties(prefix="hello")
public class HelloServiceProperties {
    private static final String MSG = "world";
    private String msg = MSG;

    public String getMsg() {
        return msg;
    }

    public void setMsg(String msg) {
        this.msg = msg;
    }
}
(3)自动配置类
import com.tyson.service.HelloService;
import org.springframework.beans.factory.annotation.Autowired;
import org.springframework.boot.autoconfigure.condition.ConditionalOnClass;
import org.springframework.boot.autoconfigure.condition.ConditionalOnMissingBean;
import org.springframework.boot.autoconfigure.condition.ConditionalOnProperty;
import org.springframework.boot.context.properties.EnableConfigurationProperties;
import org.springframework.context.annotation.Bean;
import org.springframework.context.annotation.Configuration;

@Configuration
@EnableConfigurationProperties(HelloServiceProperties.class) //1
@ConditionalOnClass(HelloService.class) //2
@ConditionalOnProperty(prefix="hello", value = "enabled", matchIfMissing = true) //3
public class HelloServiceAutoConfiguration {

    @Autowired
    private HelloServiceProperties helloServiceProperties;

    @Bean
    @ConditionalOnMissingBean(HelloService.class) //4
    public HelloService helloService() {
        HelloService helloService = new HelloService();
        helloService.setMsg(helloServiceProperties.getMsg());
        return helloService;
    }
}
-
@EnableConfigurationProperties 注解开启属性注入,将带有@ConfigurationProperties 注解的类注入为Spring 容器的 Bean。
-
当 HelloService 在类路径的条件下。
-
当设置 hello=enabled 的情况下,如果没有设置则默认为 true,即条件符合。
-
当容器没有这个 Bean 的时候。
(4)注册配置
想要自动配置生效,需要注册自动配置类。在 src/main/resources 下新建 META-INF/spring.factories。添加以下内容:
org.springframework.boot.autoconfigure.EnableAutoConfiguration=\
com.tyson.config.HelloServiceAutoConfiguration
"\"是为了换行后仍然能读到属性。若有多个自动配置,则用逗号隔开。
(5)使用starter
在 Spring Boot 项目的 pom.xml 中添加:
<dependency>
    <groupId>com.tyson</groupId>
    <artifactId>spring-boot-starter-hello</artifactId>
    <version>1.0-SNAPSHOT</version>
</dependency>
运行类如下:
import com.tyson.service.HelloService;
import org.springframework.beans.factory.annotation.Autowired;
import org.springframework.boot.SpringApplication;
import org.springframework.boot.autoconfigure.SpringBootApplication;
import org.springframework.web.bind.annotation.RequestMapping;
import org.springframework.web.bind.annotation.RestController;

@RestController
@SpringBootApplication
public class SpringbootDemoApplication {

    @Autowired
    public HelloService helloService;

    @RequestMapping("/")
    public String index() {
        return helloService.getMsg();
    }

    public static void main(String[] args) {
        SpringApplication.run(SpringbootDemoApplication.class, args);
    }

}
在项目中没有配置 HelloService bean,但是我们可以注入这个bean,这是通过自动配置实现的。
在 application.properties 中添加 debug 属性,运行配置类,在控制台可以看到:
   HelloServiceAutoConfiguration matched:
      - @ConditionalOnClass found required class 'com.tyson.service.HelloService' (OnClassCondition)
      - @ConditionalOnProperty (hello.enabled) matched (OnPropertyCondition)

   HelloServiceAutoConfiguration#helloService matched:
      - @ConditionalOnMissingBean (types: com.tyson.service.HelloService; SearchStrategy: all) did not find any beans (OnBeanCondition)
可以在 application.properties 中配置 msg 的内容:
hello.msg=大彬
@Value注解的原理
@Value的解析就是在bean初始化阶段。BeanPostProcessor定义了bean初始化前后用户可以对bean进行操作的接口方法,它的一个重要实现类AutowiredAnnotationBeanPostProcessor为bean中的@Autowired和@Value注解的注入功能提供支持。
Spring Boot 需要独立的容器运行吗?
不需要,内置了 Tomcat/ Jetty 等容器。
Spring Boot 支持哪些日志框架?
Spring Boot 支持 Java Util Logging, Log4j2, Lockback 作为日志框架,如果你使用 Starters 启动器,Spring Boot 将使用 Logback 作为默认日志框架,但是不管是那种日志框架他都支持将配置文件输出到控制台或者文件中。
YAML 配置的优势在哪里 ?
YAML 配置和传统的 properties 配置相比之下,有这些优势:
- 配置有序
- 简洁明了,支持数组,数组中的元素可以是基本数据类型也可以是对象
缺点就是不支持 @PropertySource 注解导入自定义的 YAML 配置。
什么是 Spring Profiles?
在项目的开发中,有些配置文件在开发、测试或者生产等不同环境中可能是不同的,例如数据库连接、redis的配置等等。那我们如何在不同环境中自动实现配置的切换呢?Spring给我们提供了profiles机制给我们提供的就是来回切换配置文件的功能
Spring Profiles 允许用户根据配置文件(dev,test,prod 等)来注册 bean。因此,当应用程序在开发中运行时,只有某些 bean 可以加载,而在 PRODUCTION中,某些其他 bean 可以加载。假设我们的要求是 Swagger 文档仅适用于 QA 环境,并且禁用所有其他文档。这可以使用配置文件来完成。Spring Boot 使得使用配置文件非常简单。
SpringBoot多数据源事务如何管理
第一种方式是在service层的@TransactionManager中使用transactionManager指定DataSourceConfig中配置的事务。
第二种是使用jta-atomikos实现分布式事务管理。
spring-boot-starter-parent 有什么用 ?
新创建一个 Spring Boot 项目,默认都是有 parent 的,这个 parent 就是 spring-boot-starter-parent ,spring-boot-starter-parent 主要有如下作用:
- 定义了 Java 编译版本。
- 使用 UTF-8 格式编码。
- 执行打包操作的配置。
- 自动化的资源过滤。
- 自动化的插件配置。
- 针对 application.properties 和 application.yml 的资源过滤,包括通过 profile 定义的不同环境的配置文件,例如 application-dev.properties 和 application-dev.yml。
Spring Boot 打成的 jar 和普通的 jar 有什么区别 ?
- Spring Boot 项目最终打包成的 jar 是可执行 jar ,这种 jar 可以直接通过
java -jar xxx.jar命令来运行,这种 jar 不可以作为普通的 jar 被其他项目依赖,即使依赖了也无法使用其中的类。 - Spring Boot 的 jar 无法被其他项目依赖,主要还是他和普通 jar 的结构不同。普通的 jar 包,解压后直接就是包名,包里就是我们的代码,而 Spring Boot 打包成的可执行 jar 解压后,在
\BOOT-INF\classes目录下才是我们的代码,因此无法被直接引用。如果非要引用,可以在 pom.xml 文件中增加配置,将 Spring Boot 项目打包成两个 jar ,一个可执行,一个可引用。
SpringBoot多数据源拆分的思路
先在properties配置文件中配置两个数据源,创建分包mapper,使用@ConfigurationProperties读取properties中的配置,使用@MapperScan注册到对应的mapper包中 。
#Java##春招#


